
Hi Everyone! Welcome to the Chibitronics and Winnie & Walter Collaboration Blog Hop (you should arrive from Kelly Griglione’s blog). To celebrate this collaboration both Chibitronics and Winnie & Walter will each offer a giveaway and 2 random winners will be selected from comments from all the blogs. The more blogs you visit and comment on the better your chance of winning. Chibitronics will give a way a $30 starter kit and Winnie & Walter will give a way a $30 gift certificate. Please note, you can leave comments until 11:59 PM CST next Tuesday, May 29th in order to be eligible for the giveaways
Chibitronics Blog
Jessica Frost-Ballas
Eiko Uchida
Kelly Szafron
Wei Wei Wang
Kelly Griglione
Tiffany Au
Lesley Oman
Maya Isaksson
Vanessa Amann
Gayatri Murali
Heather Hoffman
Jessica Lin
Kate Capper
Keren Baker
Lea Lawson
Lydia Evans
w&w blog
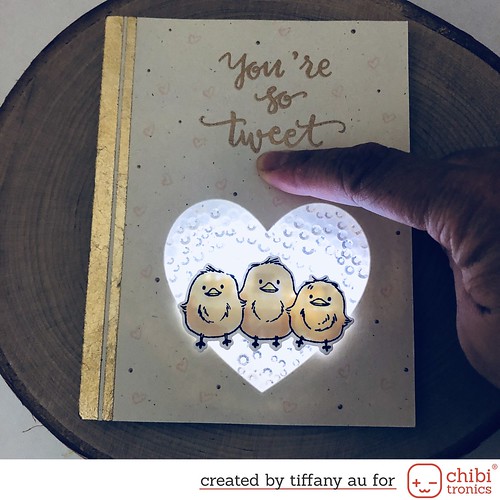
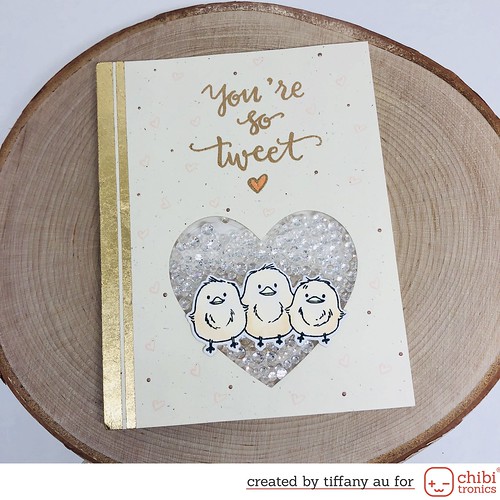
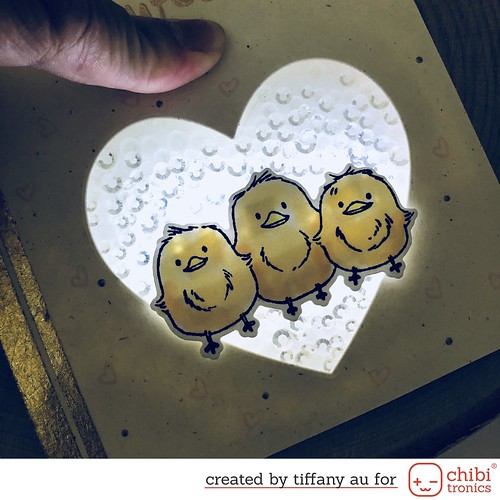
For this collaboration I used the adorable So Tweet stamp set and the True Multifaceted Heart Die to create a gold themed shaker card. My shaker will be filled with tiny clear gems that will sparkle when the Chibitronics LED stickers lights up behind it.
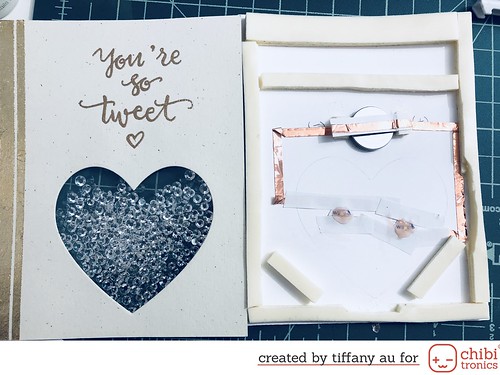
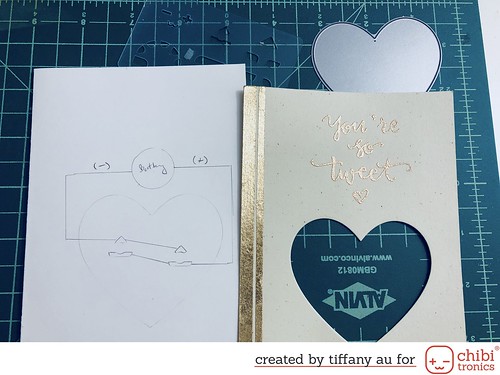 To make this card I first assemble my card base and my front panel. My front panel consist of a cream colored card stock trimmed to 5.5″ x 4.25″ with my sentiment heat embossed on top with gold embossing powder. I next used the solid heart die to cut out my shaker window. Create my left edging by placing 2 different width of scor-tape and covering it with gold gilding flakes from Tonic. Mark where the heart window and the tiny heart from the sentiment onto my card base. The large heart will be where I place 2 LED stickers and the tiny heart above that will be where the battery is placed. Then I draw in my circuit path connecting everything.
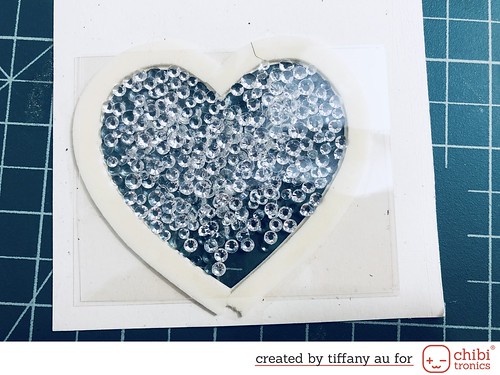
To make my shaker, I first cover my window with acetate and place a thin strip foam tape around the edge to create my pocket. Fill it with sparking crystals and then place another piece of acetate to seal it.
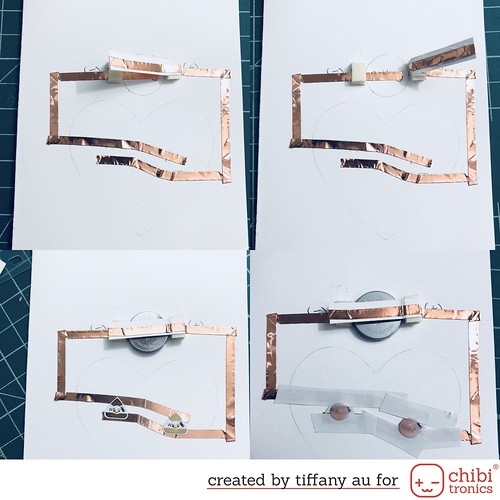 To create my LED circuit I first lay down my negative tape side connecting the battery to where the LED stickers will be placed. For the positive side, I first placed a small piece of 3 layered foam tape around the battery to create a “bridge” and then lay down my positive copper tape connecting my LED sticker to the bridge and around it. Tape my battery down with scor-tape and last cover the copper tape with post-it tape so it will not show through my shaker window and place a large dollop of Rose Water Nuvo drops over the LED light. This will create a diffused light source.
I finish my card by placing triple layered foam tape around my card base and then taping my front panel down. Last I stamp out the 3 birds from the stamp set and color it with copic markers. Cut it out using the coordinating dies and placing it over my shaker window with foam tape.
I hope you enjoy this tutorial and please remember to leave a comment to enter the give a way.
Supplies Used:
- Chibitronics White LED Lights
- Chibitronics Copper Tape
- Winnie & Walter – True Multifaceted Heart Cutaways
- Winnie & Walter – So Tweet
- Coin Battery
- Cream Card Stock
- White Card Stock
- Tonic Gold Gilding Flake
- Studio Katia Sparking Crystals
- Scor-Tape (1/4″ and 1/8″)
- Acetate Sheets
- 3M Foam Tape
- Post-it Tape
- Rose Water Nuvo Jewel Drop

I love your glowing shaker card! So cute!
LikeLike
This is so clever! Absolutely adorable to let the birds shine on!
LikeLike
What an adorable card. Love your chickies.
LikeLike
That’s a really cute card !! And thanks for the great tutorial.
[margessw(at)icloud(dot)com]
LikeLike
Wowsers Tiffany! I never thought to use a shaker window to light up. Super clever! Your card is adorable!!!
LikeLike
Nice idea to use the clear gems to pick up the light 🙂
LikeLike
Super sweet card, lovely design. How fantastic to light up the gems in the shaker, just wonderful.
LikeLike
Oh my–this is so cute!!
LikeLike
Wow, this card is really taking creativity to the next level!
LikeLike
Your so tweet.. that is great!
LikeLike
Oh my!!! This is so cute!!! ❤
LikeLike
I love all of the new ideas!
LikeLike
Sweet and delightful!
LikeLike
Your card is so adorable.
Thanks for sharing…
LikeLike
awwww this is just darling – love it:)
LikeLike
So cute! 🙂
LikeLike
WoW!!! This is awesome! I love the shaker card aspect of this card with the light up element. So cool!
LikeLike
Cute shaker card! Thanks for the chance to win and sharing.
LikeLike
Aww.. So cute…Love love love it..Thank you for sharing..
LikeLike
I love blog hops because they inspire me to create–thank you!!!
LikeLike
It looks so bright in your photo. I’m amazed at the combination of shaker and Chibitronics. I also love the gold accents. Just perfect. Thanks for sharing!
LikeLike
This is so cute!! Love it!
LikeLike
OMG!!! This is so stinkin’ adorable!!!!!!! Those 3 chicks are cute but making them light up is fabulous!!!
LikeLike
Just so cute! Makes me smile!
LikeLike
This is an awesome idea! I haven’t seen this done before. Great use of the lights.
LikeLike
I’ve never thought to use the shaker and the light together!
LikeLike
This is such a pretty card! Those birds are adorable 🙂
LikeLike
These little birdies are too cute.
LikeLike
What a fantastic idea to put the chibitronics behind clear beads.
LikeLike