Hi Everyone! Yea its the start collaboration week between Chibitronics and Newton’s Nook!!! During this week, DT members from both Chibitronics and Newton’s Nook will be showing some awesome projects and Eiko and I are staring this week off from Chibitronics. You can view everyone else projects via the links below:
8/21 Day 1
8/22 Day 2
8/23 Day 3
8/24 Day 4
8/25 Day 5
Both Chibitronics and Newton’s Nook are each giving away a $30 starter kit and a $30 gift certificate. To enter to win please leave a comment on all the blogs and we will randomly choose a winner at the end of the week!
For my card, I used the Stowaway Newton stamp set to create a card featuring Newton dreaming of a vacation. This card uses a push/pull tab to move newton’s head and tail along with lighting up the dream bubble.
 To create my card I first stamp out the large image a couple of time onto white card stock. I want the large suit cases to be in front of Newton’s head so I fussy cut that piece out along with Newton’s head and tail.
  Next, I cut out my background from white and black card stock. Did some selective stamping so that only the back of the image will show up onto the white card stock and also stamp the same image onto black card stock. Used my pen knife to cut my dream bubble and then trace those bubbles onto my card base. Then I added some Walnut distress ink onto the edge of the card.
 I then cut out a slider section from my front panel and from the black card stock. This will allow a portion of the slider tap to show through and that is where I will anchor my moving elements.
 Next, I used scor-tape and tape down my black card stock onto the back of my front panel. I also stamp the passport image onto the back of the bubble panel. So the image will only appear once the light stickers are active.
 I traced my front panel onto my card based to mark the slider window and where my front panel will fit. Next, I used a pencil mark down where my lights stickers, battery, and copper tape go (I originally was planning on having 3 small bubbles but later removed one).
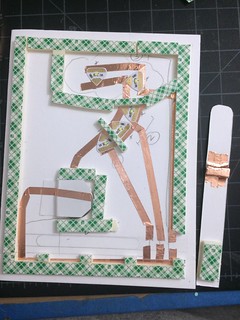
 This is how my card base looked after I put in all the Chibitronics elements to make my circuit. You will notice that I actually left a tiny break in the positive side. The connection will only be made when my slider moves pass those copper tape to complete each connection. So only one section will light up at a time. In the picture below, you will see the back of the slider tap with double foam tape on the middle and end. The middle one is later wrapped in copper tape.
 Next I add double layers of foam tape onto my card base,making sure to section out where my light bubbles are.
 This is the back of my slider tap and I have put 2 tiny brads in it for my moving elements. The brads are put in backwards with the head towards the back of the slider tap. I then placed the tap into my card base.
Before I tape down my front panel I mark down where my tail and head needs to be and punched a hole into the panel and use brads to put my head and tail in place.

 I next added the taps to move the head and tail and connect it to my slider tap. To make the movement smooth I made the bottom hole longer.Then I place the large suite case image on top using foam tape and tape down my front panel onto my card base.
 I hope you enjoy my tutorial and I look forward to reading your comments.
Supplies List
I may earn a small commission for my endorsement, recommendation, testimonial, and/or link to any products or services from this website. Your purchase helps support my work and keep me supplied in foam tape.
- Chibitronics White LED Stickers
- Copper Tape
- Energizer 2032BP-4 3 Volt Lithium Coin Battery – Retail Packaging (Pack of 4)
- Newton’s Nook-Stowaway Newton
- Neenah Exact Index, 110 lb, 8.5 x 11 Inches, 250 Sheets, White, 94 Bright
- 3M Scotch 1/2-Inch by 36-Yard Double-Sided Foam Tape
- Scor-Pal Scor Tape, 1-Inch by 27-Yard
- Judikins Embossable Window Plastic Sheets, 4.25-Inch x 5.5-Inch, Clear, 20-Pack


Wow, how creative! And such a darling card. Love it!
Thanks for the step by step.
LikeLike
Very clever card! Love Newton with the suitcases, and the addition of the lights make the card so special!
LikeLike
So cute and very clever design.
LikeLike
You are so creative! Your design is wonderful. Thank you for the detailed instructions.
LikeLike
Wow, how fun is this with
all the moving parts and
lights! Awesome work.
Carla from Utah
LikeLike
Awww!!! How cute and fun!!!
LikeLike
Wow, what an amazing card! I’m quite intimidated by the mechanics of your card, but super impressed, too!
LikeLike
Very cute card! The lights just add that special touch. Going to have to give it a try.
LikeLike
This card is fabulous! I love how the kitty is dreaming of a vacation! The instructions are so helpful too! Thank you so much for being part of our fun inspiration week!
-Jen {Newton’s Nook Designs}
LikeLike
Adorable card! You did a great job.
LikeLike
Absolutely amazing! Love the “thought” process! lol
LikeLike
How cute is that hidden message?!! Genius!
LikeLike